Have you heard of LibriVox? I hadn't until a few weeks ago, and now it is one of my favorite things! LibriVox is a website devoted to audiobooks. All of the books on the site are in the public domain (meaning they were published before 1923, so no one can sue over copyright issues). The neatest part is that it is all run by volunteers and it's all free. People record themselves reading a book, and then you can download and listen to them. Some readers are better than others, but everyone is just a regular person that loves reading. Anyone can volunteer. (I've signed up, but haven't read anything yet). You can read a whole book, or work with other volunteers and just read a few chapters. They also have short stories and poetry.
What kind of books are public domain? The classics: Anne of Green Gables, Treasure Island, Gulliver's Travels, Pride and Prejudice, Little Women, The Secret Garden, A Christmas Carol, etc. Some of the authors include Jane Austen, Mark Twain, Charles Dickens, Louisa May Alcott, Frances Hodgson Burnett, and hundreds more.
I love to listen to books while I do dishes, or while I'm cross stitching. I've had so much fun with this, so I thought I'd share it with you. (If you have any other questions, you can go HERE). Hope you enjoy!
Saturday, September 24, 2011
Thursday, July 21, 2011
Homemade Bread Bowls
I don't think there is anything more satisfying than eating a delicious bowl of potato soup, and then being able to eat your bowl! I made these bread bowls for dinner last night and they were absolutely scrumptious.


To make them, you will need:
2 packages of active dry yeast {or 4 and 1/2 tsp. if you don't have the envelopes}
1 cup warm water {110-115 degrees}
1 cup warm milk {110-115 degrees}
1/2 cup shortening
1/2 cup sugar
2 eggs
2 tsp. salt
6 cups all-purpose flour
Cornmeal
1. In a mixing bowl, dissolve yeast in warm water. {about 5 mins}
2. Add the milk, shortening, sugar, eggs, salt, and 2 cups of flour; beat until smooth.
3. Stir in enough remaining flour to form a soft dough.
4. Turn onto a floured suface; knead until smooth and elastic. {about 6-8 mins}
5. Place in a greased bowl, turning once to grease top.
6. Cover and let rise in a warm place until doubled in size. {about 1 hr}
7. After raising, punch down dough.
8. Turn onto a lightly floured surface.
9. Divide in to eight pieces; shape each into a ball.
10. Grease two baking sheets and sprinkle with cornmeal.
11. Place four balls 3 in. apart on each prepared pan.
12. Cover and let rise until doubled. {about 30 mins}
13. Bake at 350 degrees F for 20-25 mins or until golden brown.
14. Remove from pans to wire racks to cool.
To make your bread ball into a bread bowl, cute a thin slice off the top of the bread. Hollow out the inside, leaving a 1/4 in. shell. You can discard the removed bread or use it to dip in your soup, chili, chowder, or stew.
Not only are they delicious, but kids enjoy them too! {at least I did as a kid}
Enjoy!
-Sarah
Monday, July 18, 2011
Sugar Free Strawberry Cobbler
I have been trying to adjust all of my favorite recipes to be sugar and dairy free. I decided to try this one and it was wonderful. Sorry the picture isn't great, and I forgot to take one before I ate some.....enjoy!
Sugar free Strawberry cobbler
¼ cup butter or margarine , softened- I used a dairy free margarine
1 ¼ cup all purpose flour
3 cups fresh strawberries, cut in half lengthwise
¼ cup butter or margarine chilled
Beat ¼ cup softened butter at medium speed with an electric mixer.
Gradually add ¾ cup honey, beating well.
Add egg and vanilla extract, mixing well.
Combine 1 ¼ cup flour, baking powder, and salt in separate bowl.
Add to butter mixture alternating with milk, beginning and ending with flour mixture.
Spoon into a greased 8” square baking dish.
Arrange strawberries on top, but side down.
Combine ¼ cup flour and ½ cup Honey Powder.
Cut in ¼ cup chilled butter with pastry blender until crumbly-ish.
Crumble over strawberries.
Bake at 350 degrees for 45 min. or until a wooden toothpick inserted in center comes out clean.
I used a round 9” pie plate instead of an 8” square pan. I want to try it next time with blueberries or peaches. Mmmmmm.

Potato Salad
I am always looking for a good side dish. Whether it's for a party, a neighborhood bbq, or just dinner with the hubs, I feel like I need a good go-to dish that I know will turn out fabulous. Well, my friends, I've found it. I made this potato salad for dinner with our neighbors last night and it was all I could do not to lick the bowl clean. Now, I know there are a BILLION variations out there on how to make potato salad, and maybe I'm just a little picky when it comes to it, but I was more than impressed with the taste and simplicity of this recipe.
![]()
What you will need:
1 cup mayonnaise (I used about 3/4 cup + 1/4 cup water)
2 T vinegar
1 and 1/2 tsp. salt
1/8 tsp. pepper
1 tsp. sugar
5-6 med potatoes, peeled, cubed, and cooked
1/2 cup chopped onion
3 eggs, hard boiled
1-2 T chpped green onions
1. Combine mayonnaise, vinegar, salt, sugar, and pepper in a large bowl.
2. Add remaining ingredients.
3. Toss gently to combine well.
4. Cover and chill for 2 or more hours.
Enjoy!
-Sarah
Tuesday, June 28, 2011
Homemade Granola
I made homemade granola for our trip to Bear Lake this past weekend. It was so good, and healthy too! I got the recipe from melskitchencafe.com (all her recipes are truly amazing). I'll post the original recipe and put notes of how I made it in italics.

Preheat oven to 350 degrees. Combine all ingredients in a large bowl. Mix well to distribute oil and honey evenly. Spread a thin layer of mixture on two rimmed baking sheets (half sheet pans) lined with parchment paper (I used my silpat liners). Bake for 15-20 minutes stirring mixture and rotating sheets half way through until mixture is an even golden brown. Be careful to watch granola: it will quickly turn from golden to burnt and will continue to cook as it cools when you take it out of the oven. Mixture will be moist when it comes out of the oven but will crisp and clump as it cools. Keeps for 1-2 weeks. (Let it cool in the pans. If you stir or move it too much, it won't clump up very well).
Variations:
• Substitute any of the nuts for other nuts such as cashews, walnuts or peanuts (it’s nice to leave some of the nuts whole as it varies the texture)
• Add additional dried fruit such as apricots or dates
• Add 1/2 tsp pure vanilla extract (I always add vanilla)
• For extra-nutty granola increase proportion of nuts
Enjoy!
Classic Granola

(this is her picture as well)
6-1/2 cups old fashioned rolled oats (not quick cooking)
2-1/2 cups unsweetened, desiccated coconut (I used basic sweetened coconut)
1 cup raisins (I like golden raisins)
1 cup dried cranberries
1 1/4-1 1/2 cups sliced almonds (or whole, chopped, slivered or a combination) (I used sliced)
1 1/4 cups pecans (whole or chopped to the size you like) (I don't like pecans, so I leave these out and toss in a few more almonds).
1/2 cup high-quality honey
1/2 cup canola oil
1/2 cup sunflower seeds
1/2 cup flax seeds (I never have these, so I just substitute more sunflower seeds)
1/2 tsp salt
1/2 tsp cinnamon
(I find that I usually need a bit more of the honey/canola oil mixture to get it to clump up the way I like it. Also, if you add about 1/4 cup more honey, you can make granola bars).2-1/2 cups unsweetened, desiccated coconut (I used basic sweetened coconut)
1 cup raisins (I like golden raisins)
1 cup dried cranberries
1 1/4-1 1/2 cups sliced almonds (or whole, chopped, slivered or a combination) (I used sliced)
1 1/4 cups pecans (whole or chopped to the size you like) (I don't like pecans, so I leave these out and toss in a few more almonds).
1/2 cup high-quality honey
1/2 cup canola oil
1/2 cup sunflower seeds
1/2 cup flax seeds (I never have these, so I just substitute more sunflower seeds)
1/2 tsp salt
1/2 tsp cinnamon
Preheat oven to 350 degrees. Combine all ingredients in a large bowl. Mix well to distribute oil and honey evenly. Spread a thin layer of mixture on two rimmed baking sheets (half sheet pans) lined with parchment paper (I used my silpat liners). Bake for 15-20 minutes stirring mixture and rotating sheets half way through until mixture is an even golden brown. Be careful to watch granola: it will quickly turn from golden to burnt and will continue to cook as it cools when you take it out of the oven. Mixture will be moist when it comes out of the oven but will crisp and clump as it cools. Keeps for 1-2 weeks. (Let it cool in the pans. If you stir or move it too much, it won't clump up very well).
Variations:
• Substitute any of the nuts for other nuts such as cashews, walnuts or peanuts (it’s nice to leave some of the nuts whole as it varies the texture)
• Add additional dried fruit such as apricots or dates
• Add 1/2 tsp pure vanilla extract (I always add vanilla)
• For extra-nutty granola increase proportion of nuts
Enjoy!
Tuesday, June 7, 2011
Pumpkin Pancakes
I love pumpkin pie, but I only eat it around Thanksgiving time. I went to visit my sister-in-law this weekend though and she made these little babies. Let me just tell you, they are like heaven in your mouth. They taste just like pumpkin pie. With a little bit of whipped cream and syrup, they are divine!


To make this delectable breakfast, you will need:
3 cups flour
3/4 tsp. salt
2 tsp. baking soda
1/2 tsp. cinnamon
1/4 tsp. nutmeg
1/4. tsp. ginger
2 T brown sugar
3/4 tsp. salt
2 tsp. baking soda
1/2 tsp. cinnamon
1/4 tsp. nutmeg
1/4. tsp. ginger
2 T brown sugar
2 cups pumpkin puree or canned pumpkin
2 1/2 cup sour milk* (more or less depending on moistness of pumpkin)
3 eggs
2 1/2 cup sour milk* (more or less depending on moistness of pumpkin)
3 eggs
1. Mix dry ingredients in large bowl, making a hole in the center.
2. Add pumpkin puree, sour milk, eggs to center of bowl, and mix gently. Do not overmix. If batter is a bit stiff, add a little water until it can easily be spooned onto a hot lightly greased griddle.
3. Let pancakes bake until bubbles pop in the top, then flip—just one time. Do not press down—we want these to be light and airy!
4. Serve with your choice of whipped cream, syrup, and strawberries for a yummy breakfast that tastes like dessert!
Serves 6 hearty eaters.
*Sour milk...this can be in any form: buttermilk, raw milk that has soured (not pasteurized milk), 1 tablespoon plain yogurt + water to make 1 cup, 1 3/4 teaspoon cream of tartar + milk to make 1 cup, 1 tablespoon vinegar or lemon juice + milk to 1 cup. Let stand to clabber for 5 minutes before using.
Hope you enjoy!
-Sarah
*1/6 of this recipe = 344 calories
Sunday, May 29, 2011
Chocolate Molten Lava Cake
Guest writer for the day on this girly blog: ZACH!! (fanfare and clapping)
Have you ever been sitting around craving a mountain of gooey, chocolate cake with a bit of ice cream? Well, this recipe will give you your fix in about 5 minutes. Besides, we all know how much Nikki likes her "Hot Chocolate Molten Lava Hot Chocolate Cake of Chocolate." ;)
So, what you'll need for two smaller (and probably better for you) cakes, or one large (but still really delicious) cake:
- 1 1/2 - 2 oz. chocolate bar (the Hershey milk chocolate or even Dark chocolate works great)
- 2 oz. butter (half of a stick) *Note* If you are worried about the pounds, 1/4 of a stick still tastes good too
- 3 tbsp sugar
- 3 tbsp. flour
- 1 egg
- 2 chocolate truffles (or Rolos, like the one shown in the picture above), frozen... yes, frozen. As in, you put it in the freezer for a while (or 1 for 1 big cake)
First, put the chocolate and the butter in a bowl for melting. All you need to do is nuke it in the micro for about 30 seconds, maybe even 25. Don't overdue it! It won't even look melted, but just start stirring until it's one consistency. If it just don't wanna mix, give it another 5 secs of nukage. DON'T put it in for 10 minutes and walk away and forget about it ... *cough*
In a separate bowl combine the egg and sugar. Whip it good (whip it! whip it good! ... never mind) until the sugar is somewhat dissolved. Slowly add the chocolate mix while mixing. Slowly add the flour while mixing. Now you have your batter!
Here's the fun part. Get out two mugs (or 1 big one). Yes, mugs - as in, hot chocolate mugs. Lubricate... Sarah hates that word... I mean, GREASE the insides with more butter or shortening rather liberally. Then, evenly split the batter into the two mugs. Now, drop one of your chocolate truffles in the middle. Don't worry about pushing it down much, because as you will see, during the nuking the batter kinda swarms around the truffle.
To cook: I've never put both in the microwave at the same time, and I don't know if it would mess up the time or not, so just do one of the cakes for now... Nuke it for about 1 minute and 30 seconds. Now, get out a plate, tip the mug upside down on top, give it a few taps and (hopefully) you will have a cute little chocolate addiction sitting right there in front of you! Serve with whatever else you are craving and probably shouldn't eat!
- Zach... eh... Sarah's husband...
 |
So, what you'll need for two smaller (and probably better for you) cakes, or one large (but still really delicious) cake:
- 1 1/2 - 2 oz. chocolate bar (the Hershey milk chocolate or even Dark chocolate works great)
- 2 oz. butter (half of a stick) *Note* If you are worried about the pounds, 1/4 of a stick still tastes good too
- 3 tbsp sugar
- 3 tbsp. flour
- 1 egg
- 2 chocolate truffles (or Rolos, like the one shown in the picture above), frozen... yes, frozen. As in, you put it in the freezer for a while (or 1 for 1 big cake)
First, put the chocolate and the butter in a bowl for melting. All you need to do is nuke it in the micro for about 30 seconds, maybe even 25. Don't overdue it! It won't even look melted, but just start stirring until it's one consistency. If it just don't wanna mix, give it another 5 secs of nukage. DON'T put it in for 10 minutes and walk away and forget about it ... *cough*
In a separate bowl combine the egg and sugar. Whip it good (whip it! whip it good! ... never mind) until the sugar is somewhat dissolved. Slowly add the chocolate mix while mixing. Slowly add the flour while mixing. Now you have your batter!
Here's the fun part. Get out two mugs (or 1 big one). Yes, mugs - as in, hot chocolate mugs. Lubricate... Sarah hates that word... I mean, GREASE the insides with more butter or shortening rather liberally. Then, evenly split the batter into the two mugs. Now, drop one of your chocolate truffles in the middle. Don't worry about pushing it down much, because as you will see, during the nuking the batter kinda swarms around the truffle.
To cook: I've never put both in the microwave at the same time, and I don't know if it would mess up the time or not, so just do one of the cakes for now... Nuke it for about 1 minute and 30 seconds. Now, get out a plate, tip the mug upside down on top, give it a few taps and (hopefully) you will have a cute little chocolate addiction sitting right there in front of you! Serve with whatever else you are craving and probably shouldn't eat!
- Zach... eh... Sarah's husband...
Thursday, May 26, 2011
Margherita Pizza
Zachary and I are trying an experiment this month. We sat down for Family Home Evening a couple weeks ago with a few cookbooks, paper, and pens. We spent an hour or so picking through the cookbooks for recipes that sounded good or we thought it might be fun to try. Then we put down one meal for each day of the month of May. Since there's only 2 of us and a lot of recipes we found were for 4 people on average, we figured it works out perfect to give us leftovers for lunch the next day! We even have a rating scale for all of this. One scale is for how good the food was and the other scale is for how affordable the meal was. So far, it has worked out fantastically! I feel like the hardest part about cooking is deciding what to make in the first place. This experiment has taken a lot of burden off of both our shoulders.
One of Zachary's picks was Margherita Pizza. I had never had it before, but I like pizza so I thought why not? Then I found out that it doesn' even have marinara sauce or anything on it. I thought, "No way could this ever be good." I was wrong. It was de-FREAKING-lightful!

It is fairly cheap and it definitely got an "I could eat this everyday" on our rating scale. Here's the recipe:
For the pizza dough:
- 1 1/2 c. hot water (as hot as you can run it from the tap, NOT BOILING or you will kill the yeast)
- 1 1/2 tsp. dry active yeast
- 1 tbsp. olive oil
- 1 tbsp. salt
- 1 tbsp. sugar
- 3 c. all-purpose flour
- oil for greasing the bowl
For the Margherita topping:
- olive oil for brushing
- 4 cloves sliced garlic
- 2 large ripe tomatoes, or similar quantity of small ones, or cherry tomatoes (whatever you have on hand, can purchase at the grocery store, or can pick out of your garden)
- 3/4 c. grated mozzarella
- 1/4 c. grated parmesan
- about 15 large fresh basil leaves
1. Sprinkle the yeast over the top of the hot water. Use the hottest water that you can run from your kitchen tap. DO NOT use boiling water or you will kill the yeast, and your dough will not rise. Let the yeast "bloom" for 5 minutes.
2. Add the olive oil, sugar and salt to the yeast, and stir.
3. Measure the flour into a large bowl. Add the yeast mixture to the flour and, using a wooden spoon, stir until well combined. The dough will appear VERY gooey - this is normal, as it makes a much more tender dough. DO NOT add more flour to the dough during this step.
4. Brush or spray some oil over the sides of the bowl and the top of the dough. Flip the ball of dough over and oil the other side. This will help when removing the dough after rising.
5. Cover the bowl with a clean kitchen towel, and set in a warm location to rise for 1 hour. Looking for a warm location? Try above the fridge, above you cabinets, or on the stove as you're preheating the oven for the next step!
Time to enjoy a taste of traditional Italy - grab your pizza wheel and slice into a piece of heaven. I think Margherita has become my favorite food. Try it and let me know what you think!
-Sarah
Calories: 226 per slice (1/8 or pizza)
Total Fat: 4.9 g
Saturated: 2.1 g
Polyunsaturated: 0.3 g
Monounsaturated: 2.1 g
Trans: 0 g
Cholesterol: 10.3 mg
Sodium: 1011.7 mg
Potassium: 189.3 mg
Total Carbs: 37.3 g
Dietary Fiber: 2.1 g
Sugar: 4.2 g
Protein: 8.7 g
Vit. A: 8.5% DV
Vit. C 10.3% DV
Calcium: 11.2% DV
Iron: 9.3% DV
One of Zachary's picks was Margherita Pizza. I had never had it before, but I like pizza so I thought why not? Then I found out that it doesn' even have marinara sauce or anything on it. I thought, "No way could this ever be good." I was wrong. It was de-FREAKING-lightful!

For the pizza dough:
- 1 1/2 c. hot water (as hot as you can run it from the tap, NOT BOILING or you will kill the yeast)
- 1 1/2 tsp. dry active yeast
- 1 tbsp. olive oil
- 1 tbsp. salt
- 1 tbsp. sugar
- 3 c. all-purpose flour
- oil for greasing the bowl
For the Margherita topping:
- olive oil for brushing
- 4 cloves sliced garlic
- 2 large ripe tomatoes, or similar quantity of small ones, or cherry tomatoes (whatever you have on hand, can purchase at the grocery store, or can pick out of your garden)
- 3/4 c. grated mozzarella
- 1/4 c. grated parmesan
- about 15 large fresh basil leaves
(IMPORTANT NOTE: this dough recipe is good for TWO pizzas, so if you want two Margherita pizzas, just double the amount of Margherita topping ingredients, OR you could top that second pizza with your choice of traditional pizza toppings.)
1. Sprinkle the yeast over the top of the hot water. Use the hottest water that you can run from your kitchen tap. DO NOT use boiling water or you will kill the yeast, and your dough will not rise. Let the yeast "bloom" for 5 minutes.
2. Add the olive oil, sugar and salt to the yeast, and stir.
3. Measure the flour into a large bowl. Add the yeast mixture to the flour and, using a wooden spoon, stir until well combined. The dough will appear VERY gooey - this is normal, as it makes a much more tender dough. DO NOT add more flour to the dough during this step.
4. Brush or spray some oil over the sides of the bowl and the top of the dough. Flip the ball of dough over and oil the other side. This will help when removing the dough after rising.
5. Cover the bowl with a clean kitchen towel, and set in a warm location to rise for 1 hour. Looking for a warm location? Try above the fridge, above you cabinets, or on the stove as you're preheating the oven for the next step!
Onto the good stuff - this is where you can easily diverge from the recipe and top your pizza however you want, but I STRONGLY suggesting Margherita toppings. If, however, you choose to go your own way, skip ahead to the next step for directions for how to bake the pizza.
1. Slice the tomatoes as thinly as possible. Use a serrated knife to make the task easier. The more thinly you can slice them, the less soggy your pizza will get after baking. Set them aside for now.
2. Mix the mozzarella and parmesan together. Set them aside for now.
3. Thinly slice the garlic cloves and set them aside. Wash the fresh basil to remove any traces of dirt, then lay them out on paper towels to dry. These will only go on the pizza AFTER baking, or else they will dry out and lose all their flavor in the oven. By putting the basil on the pizza after cooking, they will slowly release they flavor as they warm with the residual heat of the freshly-baked pizza. (We have tried it with dry basil and it worked out fine as well.) Now you are ready to garnish your pizza!
1. Preheat the oven to 500 F. Set one rack in the lowest position in your oven. If you have a pizza stone, place it on the rack before you preheat, so that it can heat to the same temperature as the oven. If you don't have a pizza stone, you can just as easily bake the pizza on a baking sheet. A pizza stone is a good investment, however, as it makes for a nice crisp outside and tender inside to your pizza crust. I highly recommend it. (They can be found for $7.99 at Ross. Holla!)
2. Roll out half the pizza dough for one pizza, to 3/4-inch thick. Place it on the pizza stone or baking sheet. If using the baking stone, be careful not to burn yourself!
2. Roll out half the pizza dough for one pizza, to 3/4-inch thick. Place it on the pizza stone or baking sheet. If using the baking stone, be careful not to burn yourself!
3. Now for the toppings: Brush or spray the top of the rolled-out dough. This is important, as it creates a barrier between the dough and the juicy tomatoes, which prevents the dough from getting soggy. Sprinkle the garlic slices over the oiled dough. Place the tomato slices/halves/pieces over the dough, leaving a 3/4-inch space on the edge for holding the crust, and overlapping the slices where necessary. Sprinkle the mixture of cheeses over the top of the tomatoes. (If you are using dry basil, this is where you would sprinkle it to taste, over the cheese.) That's it - your pizza is topped!
4. Bake for 12-15 minutes, depending on how brown you like your crust, and how hot your oven runs.
4. Bake for 12-15 minutes, depending on how brown you like your crust, and how hot your oven runs.
Once that timer rings, remove the pizza from the oven, either on its baking sheet or using a pair of tongs to slide it off the stone and onto a cutting board. Turn off the oven.
Immediately place the fresh basil leaves on top of the freshly-baked pizza. The heat from the melted cheese will wilt the basil and release all the flavorful oils into the air and into the pizza.
Immediately place the fresh basil leaves on top of the freshly-baked pizza. The heat from the melted cheese will wilt the basil and release all the flavorful oils into the air and into the pizza.
Time to enjoy a taste of traditional Italy - grab your pizza wheel and slice into a piece of heaven. I think Margherita has become my favorite food. Try it and let me know what you think!
-Sarah
Calories: 226 per slice (1/8 or pizza)
Total Fat: 4.9 g
Saturated: 2.1 g
Polyunsaturated: 0.3 g
Monounsaturated: 2.1 g
Trans: 0 g
Cholesterol: 10.3 mg
Sodium: 1011.7 mg
Potassium: 189.3 mg
Total Carbs: 37.3 g
Dietary Fiber: 2.1 g
Sugar: 4.2 g
Protein: 8.7 g
Vit. A: 8.5% DV
Vit. C 10.3% DV
Calcium: 11.2% DV
Iron: 9.3% DV
Wednesday, May 18, 2011
Buffalo Dip
We have been lacking posts lately, so I thought I would update with a couple of my favorite recipes.
This recipe is addicting and a crowd pleaser!
Have a party or event coming up and need an appitizer?
Check out this recipe here.

Enjoy!
-Nikki
Mississippi Mud Cake
I posted this recipe here.
It is a great rich combination of brownie and marshmallow!
MmmMm!
I LOVE them!

Enjoy!
-Nikki
Wednesday, May 4, 2011
flannel baby blankets
This is an easy sewing project that even the beginner can do.
It makes for nice shower gifts or a fun project for your own.
I made these for my baby boy. I had 3 coupons for 40% off a cut of fabric, and decided to use them today.
I got a 1.25 yards of 4 different fabrics
The best part is you don't have to make any cuts because they are (or should be) the same size as one another!
First I pinned two of the fabrics together, printed side facing inwards toward each other and pinned them together like so.

then I sewed the two pieces together, leaving a 4 inch gap open to flip it right side out. Top stitch your opening to close it off. After closing it off, I ironed it to get it to lay flat. Once it is ironed flat, stitch around the edges to give it a nicer look and to keep it in place. I used a 3/8" seam allowance.
Wha-la! Finished!


Have fun!
-Nikki
Tuesday, May 3, 2011

Monday, May 2, 2011

Sunday, May 1, 2011

Friday, April 29, 2011
Crock-pot Chicken

So, you will have to forgive me. I know this doesn't look like the most appetizing dish, but trust me, it is. It's also incredibly easy, which in my opinion makes it even more delicious!
All you need is:
4 chicken breasts
1 package of Italian dressing
1/2 cup of water
1. Mix it all together in a crock pot and let it slow cook for at least 4 hours.
2. After it's done cooking, take the chicken out and shred it. You can do this however you want, but I think it's easiest just to use two forks and pull apart like so:

3. Drain excess water in crock pot.
4. Add the following:
1 can of cream of chicken soup {I only add 1/2 can of water}
8 oz. (1 block) of cream cheese
5. Let sit while sirring occasionally for 30-45 minutes until the cream cheese is completely melted.
Serve over rice with your favorite veggies and voila, dinner is served!
-Sarah

Yummy Sugar Cookies
new recipe here
I made these for Arika's movie-themed birthday party!
They were really yummy :)

Enjoy!
-Nikki
Wednesday, April 27, 2011
72 hour kits
Derek and I officially completed our 3 month food storage supply.
As I was finishing up labeling everything, our 72 hour kits crossed my mind.
Im pretty sure we made them when we were first married, and have only updated them once in over 3 years. Yuck.
I pulled those out today and went through them. All our food had most definitely expired and they needed to be updated. So once Derek got off work, I had my list in hand and we were off to go grocery shopping.

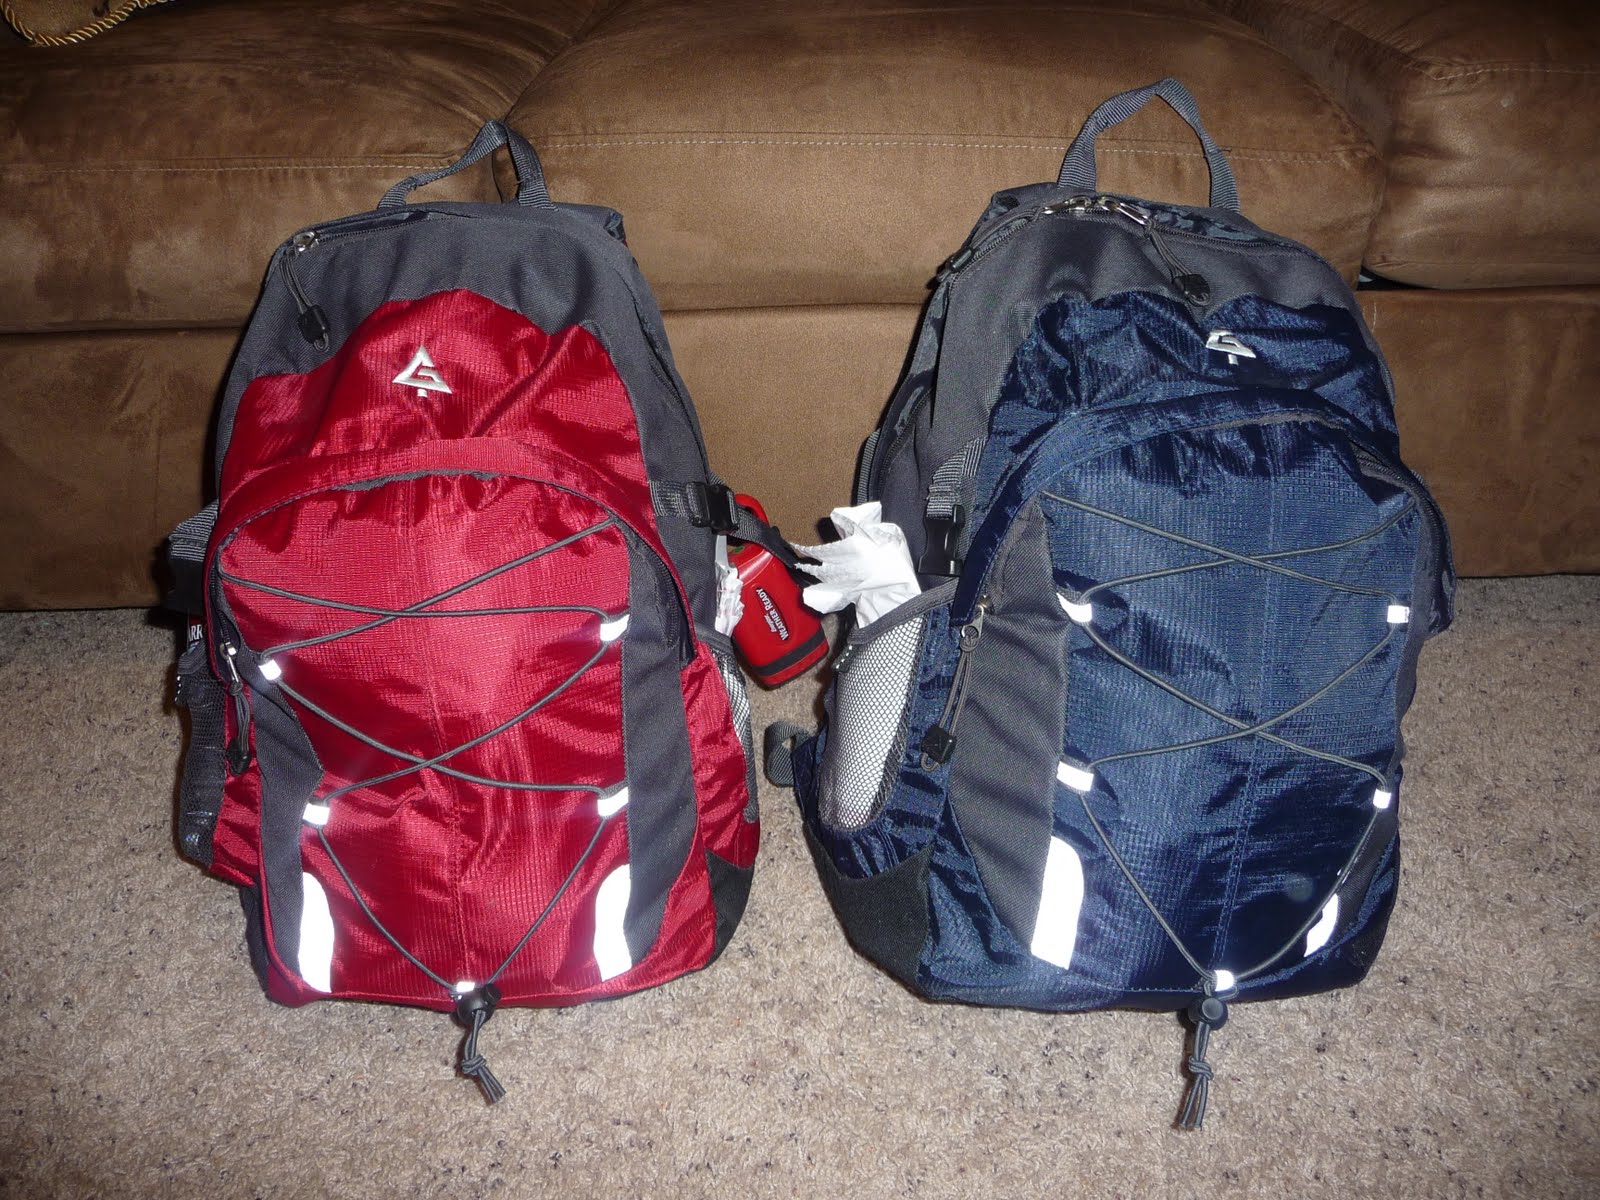
Here is what is in ours. You can adjust to fit your family's needs or likes, but this at least gives you an idea of what to get.
1 sturdy backpack per person (or rolling suitcase), or some tupperware bins (preferably with wheels). You pretty much need something that you will be able to grab at a moment's notice and throw into the back of the car
1 change of clothes per person
1 set of scriptures per family
1 flashlight per person
batteries (I put 4 batteries per bag)
small first aid kit:
- bandaids
- medicine (I put Ibuprofen in Derek's, Tylenol in mine just in case I'm prego at the time, and infant advil for my kids)
- sanitizing wipes
- disinfectant
- gauze
- neosporin
- ace bandage
personal documents (copies of birth certs, ss cards, wills, patriarchal blessings, insurance card copies, etc). It's also good to have copies of these to send to a family member who doesn't live in your same area
2 gallons water per person (this is a MINIMUM. 3 gallons per person is ideal) I could only fit 3-4 water bottles per back pack, but we have our 3 month supply of water in our garage ready for pick up.
$100 cash per family (make sure you have some change and small bills)
utility knife
battery powered radio and light
small sewing kit
Food
here is an example of food to store in your kits. Remember to rotate every 6 months!
1 lb dried fruit or trail mix per person
1 pkg soda crackers AND graham crackers per person (there are 4 pkgs per box)
2 liter bottle of orange juice or similar per person (we did 4 caprisuns per person)
4 granola bars per person
3 fruit snacks per person
1 can meat per person
1 can chili per person
1 can beans per person
3 packages oatmeal per person
2 sticks beef jerky per person
1 pkg chewing gum per person
3 packets hot chocolate mix per person
2 instant soup packets per person
1 roll of toilet paper per person
1 package baby wipes for Avrie
feminine needs
infant needs
1/2 lb dried milk per person
hard candy / lollipops
2 lighters
hand warmers
prepare blankets or sleeping bags to be accessible at a moment's notice
1 small toothbrush per person
1 travel size of the following per person:
- toothpaste
- soap
- shampoo/conditioner
- sunscreen
- lotion
- deodorant
- floss
- tissue
silver foil emergency blankets (one per person)
mosquito repellent
duct tape
scissors
small entertainment (crayons, card games, etc) and paper/pencils
work gloves (2 pair per family)
mess kits or disposable plates/cups/bowls/utensils
sippy cup for Avrie
pet supplies (not needed for our family, but something to think about if you have a pet)
candles, holders, matches
aluminum foil
can opener
disinfectant
garbage bags
It is also good reminder to UPDATE your 72 hour kit EVERY 6 MONTHS. Something I am going to be better at from here on out. It is sad to waste food, or if crisis came, to not have good food on hand. Also, keep a list of everything inside and their expiration dated inside each backpack, so the next time you update you know what to get and what to throw out.
Good Luck!
-Nikki
Tuesday, April 26, 2011
Giant Cupcake Base
I got a lot of compliments on Avrie's giant cupcake she had almost a year ago for her birthday. I thought I would share my secret to my fun cupcake base

Everyone pretty much knows about this awesome giant cupcake mold pan from wilton...

Bake your cake according to the pan's directions.
Now comes the fun part that made my cupcake kind of unique. i didn't like just the plain old cake for the base. I tried fondant and it still didn't show the groves like I wanted it to. SO I thought, why not use white chocolate?!
I really like the Kroger brand of white chocolate. I like the taste and you get a lot of chocolate in the package. Not to mention its cheaper than the candy melts.
I melted the white chocolate according to the packages directions then added the color food coloring I wanted, in my case, lime green. I then painted the chocolate onto the base part of the cupcake pan. I painted until I had it about 5 layers. Once you get a nice thick coating of white chocolate, stick it in the freezer for 10-15 minutes to let it set. It pulls out really nicely.
Once your cake is completely cooled, you trim the base to fit inside your shell. The top will sit nicely on top of the shell. Then frost the top however you would like! I used a pink frosting and swirled it!
these giant cupcakes are seriously so cute! For all the other party guests, I thought it would be fun to serve little cupcakes.

have fun!
-Nikki
The Best Snickerdoodles EVER!
While living in Alabama last month, my husband and I decided to invite some friends over for dinner. I wanted to make some kind of dessert and was scrounging around for recipe ideas. I decided that I wanted it to be something easy {having dinner guests is stressful enough, no point in making it harder for yourself} and I came across this recipe for the most delightful snickerdoodles in the world!
You will need:
2 and 3/4 cups flour
2 tsp. baking powder
1/2 tsp. salt
1 cup {2 sticks} unsalted butter, softened
1 and 1/2 cups sugar
2 large eggs
Also:
1 cup sugar
2 tsp. cinnamon
1. Preheat oven to 350 degrees Fahrenheit.
2. Sift together flour, baking powder, and salt; set aside.
3. Cream together butter and 1 and 1/2 cups sugar. If you are doing this by hand, cream them until pale and fluffy. If you are doing this with a mixer, about 3 minutes should do the trick. This is important, so that your cookies turn out full.
4. Mix in eggs.
5. Gradually mix in flour mixture.
1. Stir together cinnamon and sugar in a small bowl.
2. Shape dough into about 1 and 3/4 inch balls.
3. Roll balls in cinnamon sugar.
4. Space 3 inches apart on ungreased baking sheet.
5. Bake for 12-15 minutes.
They go FABULOUSLY with a large glass of milk.
Enjoy!
-Sarah
Car Seat Cover
I never had one of these for Avrie.
I see them everywhere and wanted to try and make one for the baby boy coming in just a few short weeks.
I LOVED the way it turned out!

this picture has the corner flipped so you can see the underside fabric

here's how to make one for yourself:
Materials needed:
- 2 yards of coordinating fabric: 1 yard each (cotton is good for all season, flannel/ fleece/ minky is good for winter)
- Thread
- pins to hold fabric together
- sewing machine
- Any accessories you want to add (buttons, bows, flowers, trim, etc)
1. cut a rectangle that is about 40 inches x 34 inches with rounded corners. You can cut one piece of fabric first, and then use that one as a guide to cut the other. That is what I did, but you can also lay the two fabrics on top of each other, printed sides facing inside towards each other. I did mine with rounded corners, but you can leave it rectangle if you want. To do rounded corners I grabbed a bowl and traced it on each of the corners.


Once you have both pieces of fabric cut identically, pin them together so they don't move.

I sewed a 3/8" seam allowance on mine. Before you sew it up all the way, save about a 4 inch gap. Pull the fabric through to turn it right side out. Once you have it completely turned out, top stitch your opening to close it off. After you finish stitching it up, iron it flat so that it is easier to sew.

Once it is ironed flat, stitch around the edges to give it a nicer look and to keep it in place. I used a 3/8" seam allowance.

Now come the straps. Some people like Velcro straps, I personally like tie straps. Using the scraps of the underside fabric, I made my straps. I cut (4) 3.5 inch by 42 inch strips and sewed them the same way I did the main part. Sew around on 3 sides, leaving one short side open to turn the fabric. Turn the strips right side out, and iron flat, as well as turning the open short side in. Topstitch all the way around, closing the opening. Do this to the remaining strap. Stitch around each strap to give it that finished look and to help keep it in place.

Next you’ll want to figure out where to place the straps. Every car seat is different, so if you are making it for yourself, you might want to try to figure out the best place for the straps by draping the blanket over the seat and marking where the straps work the best. I sewed min 19 inches down, 13 inches in on each side. Sew them long ways to your car seat cover
and there you have it! your carseat cover!
have fun!
-Nikki
Monday, April 25, 2011
Chicken-Fried Chops in the Slow Cooker
For our new visitors,
I have my own recipe blog located here.
In order to still keep that one updated I will post the actual recipes there, but still let people know at the Avon Bunch that there is a new recipe!
So go and check it out!

Enjoy!
-Nikki
Fabric Flowers #2
These were made for Sarah's wedding.
They are very simple to do!
We made them as wrist bands, but you can make them into pretty much whatever you want!

Here is a pretty good tutorial.
Have fun!
-Nikki
Sunday, April 24, 2011
Easter Cupcakes
Today, I decided to try and be creative by making some easter cupcakes! I saw the idea for these on our aunt's blog and fell in love with it.

I tweaked it a little bit though and here is how...These are the ingredients you will need:

My husband and i are trying harder to be healthy, so we went with a low calorie chocolate cupcake. here is the recipe:
2. Soften your butter beforehand and cream it with the sugar in a large mixing bowl until it's a nice, light, fluffy mixture.
3. Next, add the egg and egg white separately and beat the mixture well. Use your own manpower or an electric beater to whip it all together.
4. Stir in the buttermilk, water, vinegar and vanilla.
5. Mix your dry ingredients together and then add it to your batter until it's moist.
6. Finally, add in the secret ingredient -- chocolate chips.
7. Now fill your muffin tins 2/3 of the way full of batter.
8. Back for 15-18 minutes.
While you are letting them bake, this is where the fun begins. You will need:

3. Cut off about 1 inch of green Twizzler and then snip it in half vertically. Turn each half into a leafy top by cutting fringe in one end.

4. Insert the carrot tops into the holes in the carrots.


My husband and i are trying harder to be healthy, so we went with a low calorie chocolate cupcake. here is the recipe:
- 2 tbsp butter
- 3/4 cup sugar
- 1 egg
- 1 egg white
- 1/2 cup buttermilk
- 1/3 cup water
- 1 tbsp white vinegar
- 1 tsp vanilla extract
- 1 1/2 cup all-purpose flour
- 1/4 cup baking cocoa
- 1 tsp baking soda
- 1/2 tsp salt
- 1/3 cup miniature semisweet chocolate chips
2. Soften your butter beforehand and cream it with the sugar in a large mixing bowl until it's a nice, light, fluffy mixture.
3. Next, add the egg and egg white separately and beat the mixture well. Use your own manpower or an electric beater to whip it all together.
4. Stir in the buttermilk, water, vinegar and vanilla.
5. Mix your dry ingredients together and then add it to your batter until it's moist.
6. Finally, add in the secret ingredient -- chocolate chips.
7. Now fill your muffin tins 2/3 of the way full of batter.
8. Back for 15-18 minutes.
While you are letting them bake, this is where the fun begins. You will need:
- Orange starbursts
- Green Twizzlers
- Kitchen skewers
- Kitchen scissors
- Green food coloring
- Coconut
- Green frosting
- Baggies


3. Cut off about 1 inch of green Twizzler and then snip it in half vertically. Turn each half into a leafy top by cutting fringe in one end.

4. Insert the carrot tops into the holes in the carrots.

Your carrots are done!
In a baggie, put some coconut and a few drops of food coloring in it, depending on how green you want it to be. Shake it up. When your cupcakes are finished, let them cool. Spread the frosting on them and top with green coconut, to make it look like grass. Insert 2-3 carrots in a cupcake and enjoy your creation!

P.S. Happy Easter!
-Sarah
Friday, April 22, 2011
Finger Puppets
Come church time, Avrie is all about being loud and active. I made these little guys for her church bag to help distract her and she loves them! We also practice animal sounds with them.


here's how:
Materials needed:
sissors
felt in all different color varities
small googly eyes
hot glue
sewing (optional, you can use hot glue instead)
1. You need to cut out two pieces of felt that are the same shape into a semi-oval shape. Make sure the semi-oval shape will fit over a child's finger.
Thursday, April 21, 2011
Magnet Board
This was a fun project!


I went to my local craft store, aka Debbie's work, and picked up the cute wooden magnet board, some wooden cut outs to use for the magnets that I got for about 25 cents a piece, and scrapbook paper. I picked out corresponding craft paper to the ones that matched avrie's nursery colors. I got the magnets at hobby lobby, and had the rest of the embellishments on hand.
Once again, i just traced the shapes and the magnet board to the paper and followed basically the same instructions that I used for the wood block letters I mentioned earlier.
have fun!
-Nikki
Wednesday, April 20, 2011
Fabric Flowers
I LOVE making fabric flowers! Mostly because they are so easy and cheap! Avrie has bows and flowers coming out her ears. And the fun thing about fabric flowers, is that you could totally make headbands for yourself as well!
Here is one type of fabric flower that is probably my favorite!


I got the tutorial from here.
They really are very cute and super inexpensive!
have fun!
-Nikki
Subscribe to:
Posts (Atom)