Pages

Monday, November 26, 2012

Homemade Advent Calendar

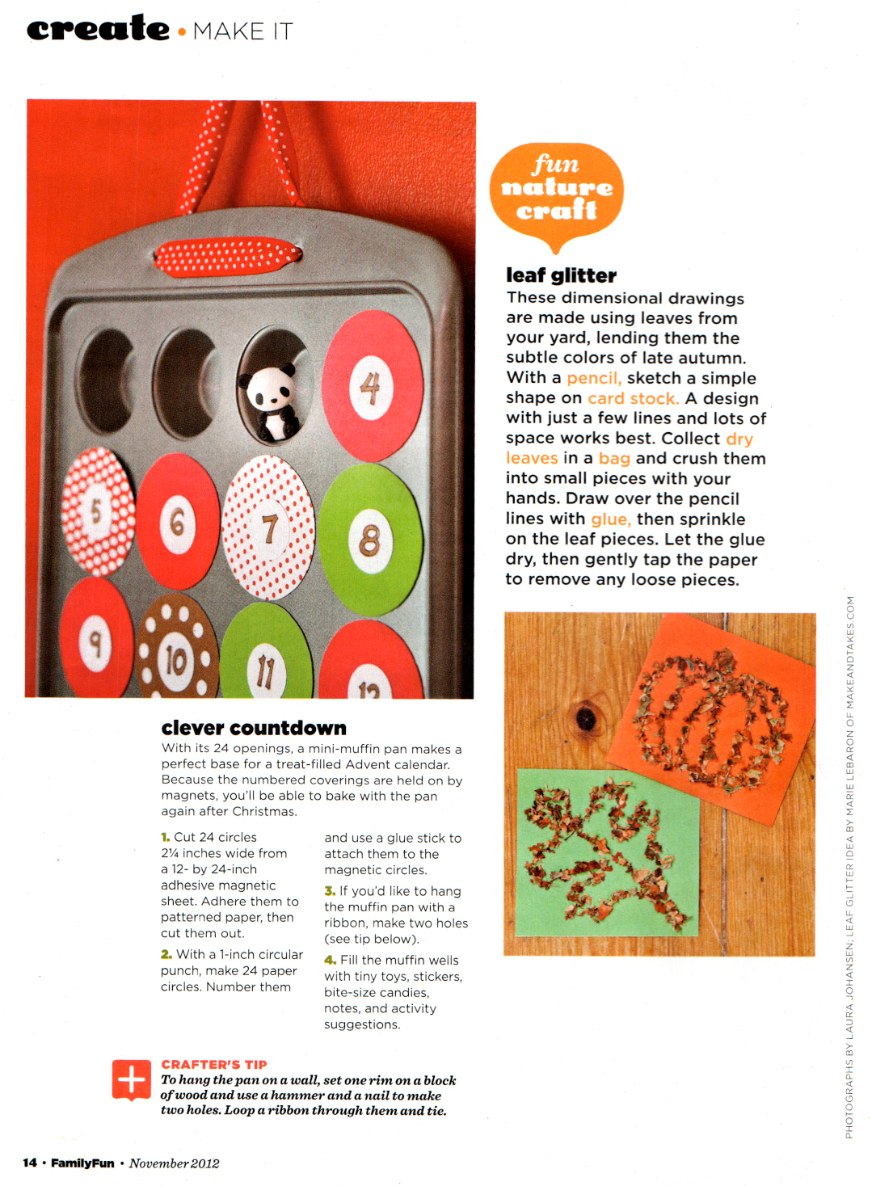
I was flipping through my latest issue of Family Fun magazine, when I spotted THIS idea for a homemade advent calendar using a mini muffin tin. I loved the idea, and couldn't wait to make one myself. Their instructions used magnet sheets, which is a brilliant idea. However, I didn't have any (or cute scrapbook paper), so I altered it to work with what I had on hand. I love how it turned out! Here's how I made mine:

Cut out white squares just large enough to cover the opening of your mini muffin tin (you need 24). Then cut circles out of red and green paper (12 each), just small enough to fit on your white squares (I traced a lid from one of my spices and it worked perfect).


Then number your circles.

To add some flare to the boring circles and squares, plus seal them with contact paper so they are reusable for future years; cut 48 squares out of contact paper, about a quarter of an inch larger on all sides then the white squares. Put the circle number-side down on one square of contact paper, then cut some strips from the other color construction paper and put those on too. The white square goes on another piece of contact paper. Flip over the circle sheet, line it up with the white square, and seal it together. Trim up the edges, and voila! One stripey muffin hole cover.


Repeat with all the numbers.


Fill your muffin tin with small treats (little candies, folded notes, etc.). I used Christmas stickers.


Put a ring of sticky tack (tape or other adhesive would also work) around the hole and seal it up!


My muffin tin conveniently had holes drilled into the top, so I threaded a ribbon through so I could hang it up. If you tin doesn't have holes, you could make your own holes (see the link to the original Family Fun instructions), hang it by the lip, or super glue some ribbon to the back. 


Hang up your completed advent calendar and get ready to count down to Christmas!

Friday, November 23, 2012

Borscht


 I cannot get enough of this borscht. It is heaven. I chose to eat borscht leftovers over Thanksgiving leftovers for lunch today. It is beyond delicious. Oh, and it's super healthy. I win.

A few weeks ago, my neighbor brought me over some fresh beets from her garden. There were a lot, so I knew I wanted to use some to make borscht. I immediately e-mailed my brother (who lived in Ukraine for two years on his mission) for a recipe. After translating it from Russian to English for me, he sent it my way.

There's nothing better on a cold winter day than soup, especially when it's a divine, healthy soup like this one is! (I think that gorgeous red color would be awesome for a Christmas soup don't you?)


Borscht

** Note: This recipe makes a TON. I halved it and had enough for dinner, a couple lunches, and still had enough to freeze for a future dinner. Also, this soup, like many soups, is even better the next day after all the flavors have had time to meld together.**

6 liters (just over 6 quarts) of water
1 medium cabbage
3 large beets
3 medium carrots
3 medium onions
1.5 lbs potatoes
1 little bundle of parsley, chopped
1/2 cup tomato paste
2 cans pinto beans or white navy beans (I always drain and rinse canned beans)
2 bullion cubes
3 tbsp salt
2 tbsp sugar
2 tbsp vinegar
Vegetable oil for sautéing
Black Pepper to taste
1 lb meat, cubed (optional, pork is great. I used what I had on hand at the time which was hamburger. I just browned it and threw it in at the end.)


  • Put water on to boil on medium-high heat (if preparing with meat, boil the meat in water until cooked, then remove and set aside).
  • Chop up the cabbage into thin strips and add to the water. Add salt. Boil for 5-10 minutes until cabbage is soft.
  • While cabbage is boiling, cube the potatoes (about 1.5" cubes) and add to the pot. Add the bullion cubes.
  • While the potatoes and cabbage are coming back to a boil, grate carrots and beets into separate bowls and chop the onions into very thin slices.
  • Sauté the carrots in oil until they are soft (about 5 min). Add onions and sauté for about 10 min. Remove from the pan and set aside.
  • Without cleaning the pan, add the beets, sugar, vinegar, and some of the broth from the pot (a few cups maybe, just enough for the beets to simmer and cook). Cover with a lid, and simmer, stirring occasionally, for 10min or until soft.
  • When the beets are soft, add the carrots and onions back to the pan. Let them sauté for a few minutes, then mix in the tomato paste. While it's sautéing, add the beans to the pot.
  • Add pan contents to the pot (along with the parsley and meat-if used) and simmer for as long as you like. (I let mine simmer for at least an hour).


 Serve with a spoonful of sour cream. 
Recipe source: Someone in the beautiful country of Ukraine, via my brother Reese.