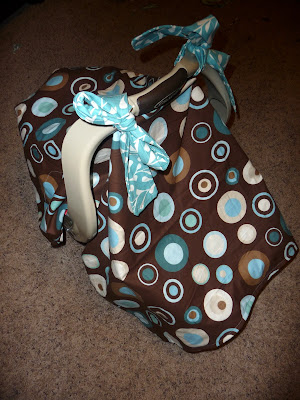
I never had one of these for Avrie.
I see them everywhere and wanted to try and make one for the baby boy coming in just a few short weeks.
I LOVED the way it turned out!
this picture has the corner flipped so you can see the underside fabric
here's how to make one for yourself:
Materials needed:
- 2 yards of coordinating fabric: 1 yard each (cotton is good for all season, flannel/ fleece/ minky is good for winter)
- Thread
- pins to hold fabric together
- sewing machine
- Any accessories you want to add (buttons, bows, flowers, trim, etc)
1. cut a rectangle that is about 40 inches x 34 inches with rounded corners. You can cut one piece of fabric first, and then use that one as a guide to cut the other. That is what I did, but you can also lay the two fabrics on top of each other, printed sides facing inside towards each other. I did mine with rounded corners, but you can leave it rectangle if you want. To do rounded corners I grabbed a bowl and traced it on each of the corners.
Once you have both pieces of fabric cut identically, pin them together so they don't move.
I sewed a 3/8" seam allowance on mine. Before you sew it up all the way, save about a 4 inch gap. Pull the fabric through to turn it right side out. Once you have it completely turned out, top stitch your opening to close it off. After you finish stitching it up, iron it flat so that it is easier to sew.
Once it is ironed flat, stitch around the edges to give it a nicer look and to keep it in place. I used a 3/8" seam allowance.
Now come the straps. Some people like Velcro straps, I personally like tie straps. Using the scraps of the underside fabric, I made my straps. I cut (4) 3.5 inch by 42 inch strips and sewed them the same way I did the main part. Sew around on 3 sides, leaving one short side open to turn the fabric. Turn the strips right side out, and iron flat, as well as turning the open short side in. Topstitch all the way around, closing the opening. Do this to the remaining strap. Stitch around each strap to give it that finished look and to help keep it in place.
Next you’ll want to figure out where to place the straps. Every car seat is different, so if you are making it for yourself, you might want to try to figure out the best place for the straps by draping the blanket over the seat and marking where the straps work the best. I sewed min 19 inches down, 13 inches in on each side. Sew them long ways to your car seat cover
and there you have it! your carseat cover!
have fun!
-Nikki


No comments:
Post a Comment