Pages

Showing posts with label kids stuff. Show all posts

Monday, November 26, 2012

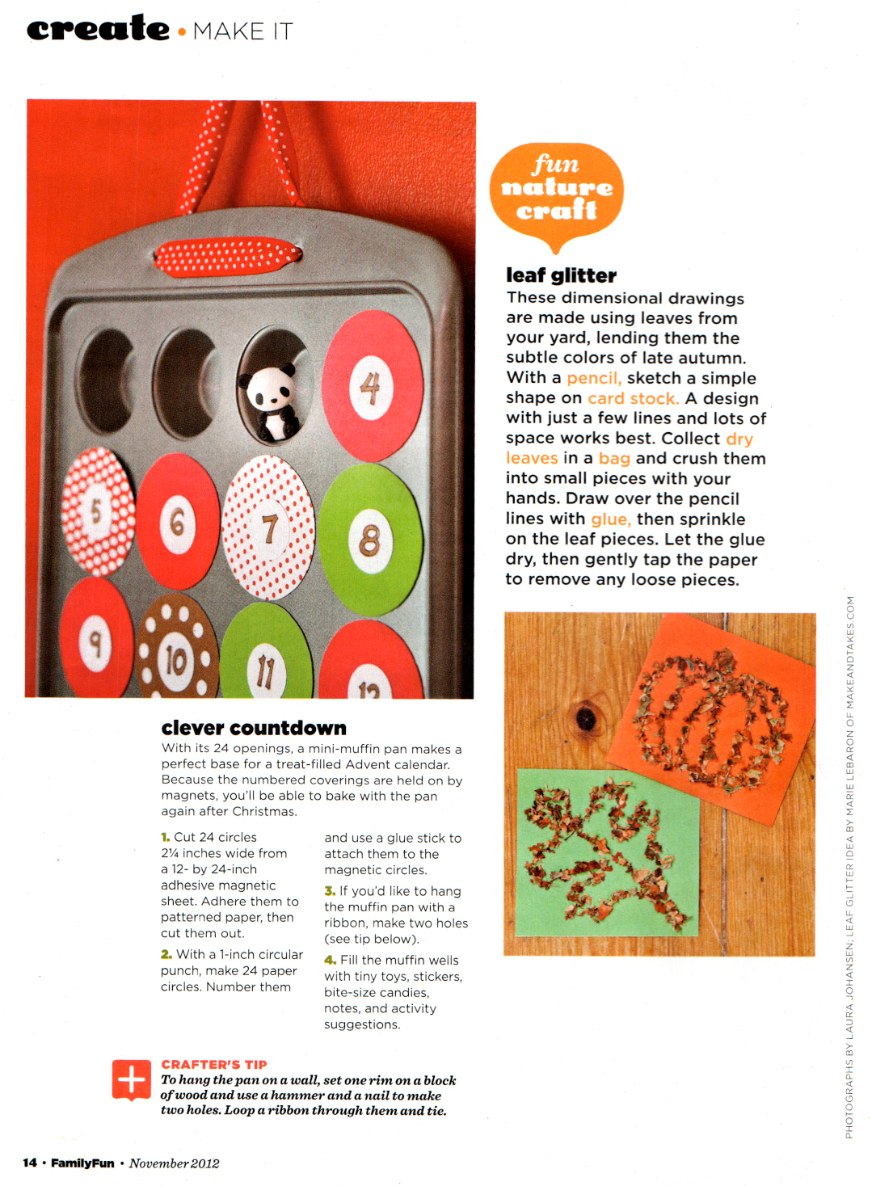
Homemade Advent Calendar

I was flipping through my latest issue of Family Fun magazine, when I spotted THIS idea for a homemade advent calendar using a mini muffin tin. I loved the idea, and couldn't wait to make one myself. Their instructions used magnet sheets, which is a brilliant idea. However, I didn't have any (or cute scrapbook paper), so I altered it to work with what I had on hand. I love how it turned out! Here's how I made mine:

Cut out white squares just large enough to cover the opening of your mini muffin tin (you need 24). Then cut circles out of red and green paper (12 each), just small enough to fit on your white squares (I traced a lid from one of my spices and it worked perfect).


Then number your circles.

To add some flare to the boring circles and squares, plus seal them with contact paper so they are reusable for future years; cut 48 squares out of contact paper, about a quarter of an inch larger on all sides then the white squares. Put the circle number-side down on one square of contact paper, then cut some strips from the other color construction paper and put those on too. The white square goes on another piece of contact paper. Flip over the circle sheet, line it up with the white square, and seal it together. Trim up the edges, and voila! One stripey muffin hole cover.


Repeat with all the numbers.


Fill your muffin tin with small treats (little candies, folded notes, etc.). I used Christmas stickers.


Put a ring of sticky tack (tape or other adhesive would also work) around the hole and seal it up!


My muffin tin conveniently had holes drilled into the top, so I threaded a ribbon through so I could hang it up. If you tin doesn't have holes, you could make your own holes (see the link to the original Family Fun instructions), hang it by the lip, or super glue some ribbon to the back. 


Hang up your completed advent calendar and get ready to count down to Christmas!

Saturday, March 17, 2012

T-Shirt Dress

It was almost St. Patrick's Day, and I realized my little girl had nothing green to wear. I didn't want to buy something new for just one day, so I got resourceful. I found one of my old t-shirts and googled "little girl t-shirt dress." After weeding out the ones that were really ugly and/or difficult, I found the perfect tutorial HERE. I had to make some adjustments since I had no elastic on hand, so I just used some strips of extra t-shirt fabric and made a drawstring. I also had to change the sleeves because my t-shirt sleeves didn't give me enough fabric. I wish I could have done the sleeves the way they were supposed to be though, because I had issues getting mine to work right. (Measuring/pinning on an 18 month old is very difficult).
Here are the before and after shots:
 
All in all, I'm pleased with how it turned out. It definitely has flaws, but it's a fun summer dress to run around the house in. The blog also had a tutorial for a t-shirt skirt that I want to try next. It would be easier than the dress (since there are no sleeves involved) and it would work with my drawstring modification. I loved these tutorials becuase both are so easy, yet very cute. They got me excited to clean out my closet and put some good use to all those old t-shirts I never wear!

Wednesday, May 4, 2011

flannel baby blankets

This is an easy sewing project that even the beginner can do.
It makes for nice shower gifts or a fun project for your own.
I made these for my baby boy.  I had 3 coupons for 40% off a cut of fabric, and decided to use them today.

I got a 1.25 yards of 4 different fabrics
The best part is you don't have to make any cuts because they are (or should be) the same size as one another!

First I pinned two of the fabrics together, printed side facing inwards toward each other and pinned them together like so.
 

then I sewed the two pieces together, leaving a 4 inch gap open to flip it right side out.  Top stitch your opening to close it off.  After closing it off, I ironed it to get it to lay flat.  Once it is ironed flat, stitch around the edges to give it a nicer look and to keep it in place.  I used a 3/8" seam allowance.
Wha-la!  Finished!


Have fun!
-Nikki

Tuesday, April 26, 2011

Car Seat Cover

I never had one of these for Avrie.
I see them everywhere and wanted to try and make one for the baby boy coming in just a few short weeks.
I LOVED the way it turned out!


this picture has the corner flipped so you can see the underside fabric


here's how to make one for yourself:

Materials needed:
  • 2 yards of coordinating fabric: 1 yard each (cotton is good for all season, flannel/ fleece/ minky is good for winter)
  • Thread
  • pins to hold fabric together
  • sewing machine
  • Any accessories you want to add (buttons, bows, flowers, trim, etc)

1.  cut a rectangle that is about 40 inches x 34 inches with rounded corners.  You can cut one piece of fabric first, and then use that one as a guide to cut the other.  That is what I did, but you can also lay the two fabrics on top of each other, printed sides facing inside towards each other.  I did mine with rounded corners, but you can leave it rectangle if you want.  To do rounded corners I grabbed a bowl and traced it on each of the corners.


Once you have both pieces of fabric cut identically, pin them together so they don't move.


I sewed a 3/8" seam allowance on mine.  Before you sew it up all the way, save about a 4 inch gap.  Pull the fabric through to turn it right side out.  Once you have it completely turned out, top stitch your opening to close it off.  After you finish stitching it up, iron it flat so that it is easier to sew.


Once it is ironed flat, stitch around the edges to give it a nicer look and to keep it in place.  I used a 3/8" seam allowance.


Now come the straps.  Some people like Velcro straps, I personally like tie straps.  Using the scraps of the underside fabric, I made my straps.  I cut (4) 3.5 inch by 42 inch strips and sewed them the same way I did the main part.  Sew around on 3 sides, leaving one short side open to turn the fabric.  Turn the strips right side out, and iron flat, as well as turning the open short side in.  Topstitch all the way around, closing the opening.  Do this to the remaining strap. Stitch around each strap to give it that finished look and to help keep it in place.


Next you’ll want to figure out where to place the straps.  Every car seat is different, so if you are making it for yourself, you might want to try to figure out the best place for the straps by draping the blanket over the seat and marking where the straps work the best.  I sewed min 19 inches down, 13 inches in on each side.  Sew them long ways to your car seat cover

and there you have it!  your carseat cover!


have fun!
-Nikki

Friday, April 22, 2011

Finger Puppets

Come church time, Avrie is all about being loud and active.  I made these little guys for her church bag to help distract her and she loves them!  We also practice animal sounds with them. 


here's how:

Materials needed:
sissors
felt in all different color varities
small googly eyes
hot glue
sewing (optional, you can use hot glue instead)


1. You need to cut out two pieces of felt that are the same shape into a semi-oval shape. Make sure the semi-oval shape will fit over a child's finger.

2.Next, you will need to sew the two pieces of felt together around the curve of the semi-circle. Keep the stitches close together. **If your looking for a faster method and don't want to whip out your sewing machine, I just hot glued mine.  Do not sew or glue the bottom of the felt pieces, as this is where the child will insert his finger into the puppet.

3.  If you decided to sew your puppets, once you have sewn the puppet together, turn it inside out. This way you will not see the seams of the thread.

4. Add details to your puppet by using felt to cut out eyes, a nose, a mouth, buttons and other details. I used googly eyes for my puppets eyes and glued them on. Use strands of yarn for hair. Add these parts using tacky glue or a hot-glue gun, as regular glue will not work well to hold the pieces together.  Basically, you create your animals to look how you want them too!

have fun!
-Nikki

Wednesday, April 20, 2011

baby taggie blanket

When Avrie was a baby, Derek's cousin made us this adorable taggie blanket for her.
She LOVED it!  Only problem, is this blanket was pink and my baby due in July is a boy.
I decided to teach myself how to make it, but in green this time for my boy.
For written instructions this tutorial is very helpful!


Have fun!
-Nikki-