Pages

Monday, November 26, 2012

Homemade Advent Calendar

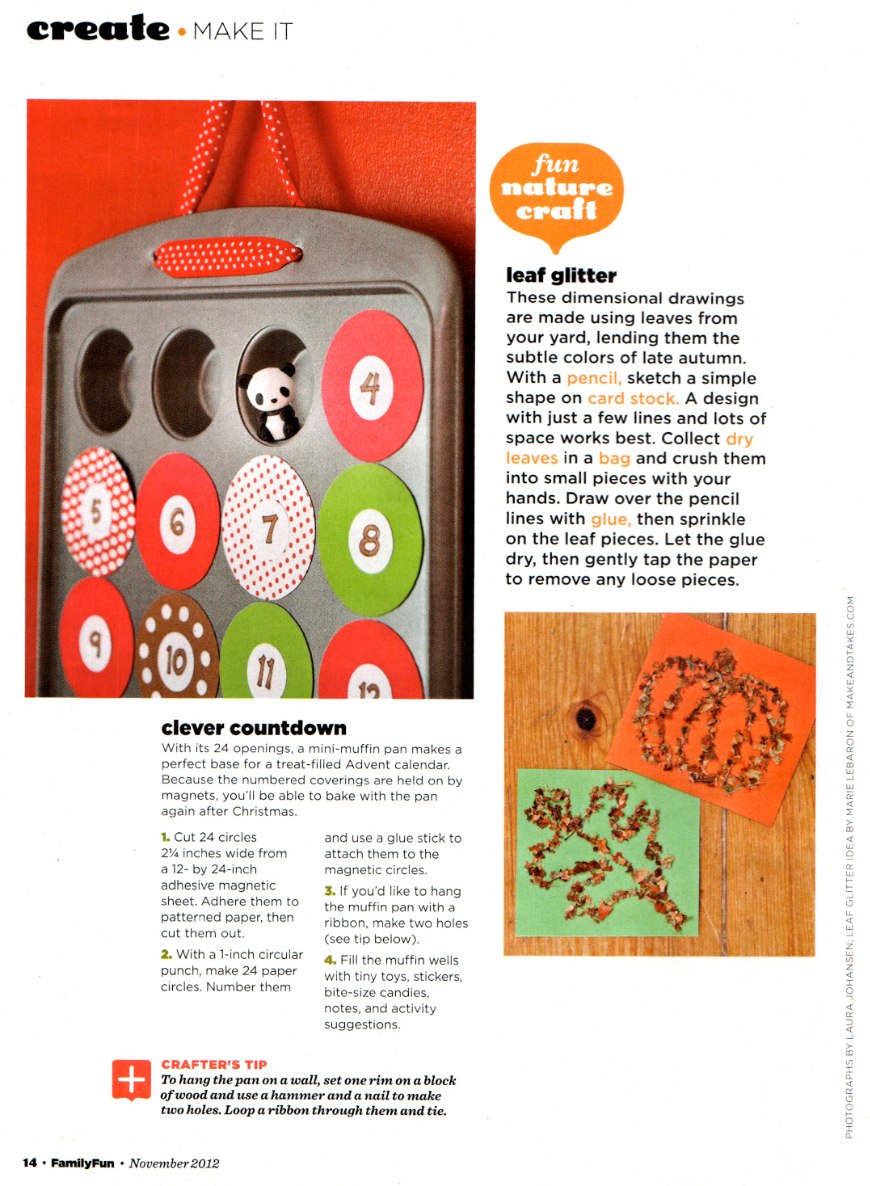
I was flipping through my latest issue of Family Fun magazine, when I spotted THIS idea for a homemade advent calendar using a mini muffin tin. I loved the idea, and couldn't wait to make one myself. Their instructions used magnet sheets, which is a brilliant idea. However, I didn't have any (or cute scrapbook paper), so I altered it to work with what I had on hand. I love how it turned out! Here's how I made mine:

Cut out white squares just large enough to cover the opening of your mini muffin tin (you need 24). Then cut circles out of red and green paper (12 each), just small enough to fit on your white squares (I traced a lid from one of my spices and it worked perfect).


Then number your circles.

To add some flare to the boring circles and squares, plus seal them with contact paper so they are reusable for future years; cut 48 squares out of contact paper, about a quarter of an inch larger on all sides then the white squares. Put the circle number-side down on one square of contact paper, then cut some strips from the other color construction paper and put those on too. The white square goes on another piece of contact paper. Flip over the circle sheet, line it up with the white square, and seal it together. Trim up the edges, and voila! One stripey muffin hole cover.


Repeat with all the numbers.


Fill your muffin tin with small treats (little candies, folded notes, etc.). I used Christmas stickers.


Put a ring of sticky tack (tape or other adhesive would also work) around the hole and seal it up!


My muffin tin conveniently had holes drilled into the top, so I threaded a ribbon through so I could hang it up. If you tin doesn't have holes, you could make your own holes (see the link to the original Family Fun instructions), hang it by the lip, or super glue some ribbon to the back. 


Hang up your completed advent calendar and get ready to count down to Christmas!

Friday, November 23, 2012

Borscht


 I cannot get enough of this borscht. It is heaven. I chose to eat borscht leftovers over Thanksgiving leftovers for lunch today. It is beyond delicious. Oh, and it's super healthy. I win.

A few weeks ago, my neighbor brought me over some fresh beets from her garden. There were a lot, so I knew I wanted to use some to make borscht. I immediately e-mailed my brother (who lived in Ukraine for two years on his mission) for a recipe. After translating it from Russian to English for me, he sent it my way.

There's nothing better on a cold winter day than soup, especially when it's a divine, healthy soup like this one is! (I think that gorgeous red color would be awesome for a Christmas soup don't you?)


Borscht

** Note: This recipe makes a TON. I halved it and had enough for dinner, a couple lunches, and still had enough to freeze for a future dinner. Also, this soup, like many soups, is even better the next day after all the flavors have had time to meld together.**

6 liters (just over 6 quarts) of water
1 medium cabbage
3 large beets
3 medium carrots
3 medium onions
1.5 lbs potatoes
1 little bundle of parsley, chopped
1/2 cup tomato paste
2 cans pinto beans or white navy beans (I always drain and rinse canned beans)
2 bullion cubes
3 tbsp salt
2 tbsp sugar
2 tbsp vinegar
Vegetable oil for sautéing
Black Pepper to taste
1 lb meat, cubed (optional, pork is great. I used what I had on hand at the time which was hamburger. I just browned it and threw it in at the end.)


  • Put water on to boil on medium-high heat (if preparing with meat, boil the meat in water until cooked, then remove and set aside).
  • Chop up the cabbage into thin strips and add to the water. Add salt. Boil for 5-10 minutes until cabbage is soft.
  • While cabbage is boiling, cube the potatoes (about 1.5" cubes) and add to the pot. Add the bullion cubes.
  • While the potatoes and cabbage are coming back to a boil, grate carrots and beets into separate bowls and chop the onions into very thin slices.
  • Sauté the carrots in oil until they are soft (about 5 min). Add onions and sauté for about 10 min. Remove from the pan and set aside.
  • Without cleaning the pan, add the beets, sugar, vinegar, and some of the broth from the pot (a few cups maybe, just enough for the beets to simmer and cook). Cover with a lid, and simmer, stirring occasionally, for 10min or until soft.
  • When the beets are soft, add the carrots and onions back to the pan. Let them sauté for a few minutes, then mix in the tomato paste. While it's sautéing, add the beans to the pot.
  • Add pan contents to the pot (along with the parsley and meat-if used) and simmer for as long as you like. (I let mine simmer for at least an hour).


 Serve with a spoonful of sour cream. 
Recipe source: Someone in the beautiful country of Ukraine, via my brother Reese.

Saturday, March 17, 2012

T-Shirt Dress

It was almost St. Patrick's Day, and I realized my little girl had nothing green to wear. I didn't want to buy something new for just one day, so I got resourceful. I found one of my old t-shirts and googled "little girl t-shirt dress." After weeding out the ones that were really ugly and/or difficult, I found the perfect tutorial HERE. I had to make some adjustments since I had no elastic on hand, so I just used some strips of extra t-shirt fabric and made a drawstring. I also had to change the sleeves because my t-shirt sleeves didn't give me enough fabric. I wish I could have done the sleeves the way they were supposed to be though, because I had issues getting mine to work right. (Measuring/pinning on an 18 month old is very difficult).
Here are the before and after shots:
 
All in all, I'm pleased with how it turned out. It definitely has flaws, but it's a fun summer dress to run around the house in. The blog also had a tutorial for a t-shirt skirt that I want to try next. It would be easier than the dress (since there are no sleeves involved) and it would work with my drawstring modification. I loved these tutorials becuase both are so easy, yet very cute. They got me excited to clean out my closet and put some good use to all those old t-shirts I never wear!

Thursday, March 15, 2012

Chicken Tikka Masala with Naan

When my friend called to ask us over for dinner and wanted to know what our thoughts were on Indian food, I'll be honest, I was a little hesitant. The only time I'd eaten Indian food was at a little restaurant in Logan, UT and I was less than impressed. This was definitely not the case this time though. Chicken Tikka Masala has to be the best meal I've ever had, hands down. I really don't know how I've gone my whole life without it. You have got to try it at least once!

{Recipe found at allrecipes.com}

The original recipe was super heavy on the salt and we didn't use a barbecue, so I've kind of tailored this recipe to what we did:

Ingredients

Marinade:
  • 1 cup yogurt
  • 1 tablespoon lemon juice
  • 2 teaspoons ground cumin
  • 1 teaspoon ground cinnamon
  • 2 teaspoons cayenne pepper
  • 2 teaspoons freshly ground black pepper
  • 1 tablespoon minced fresh ginger
  • 4 teaspoons salt, or to taste
  • 3 boneless skinless chicken breasts, cut into bite-size pieces
  • 1 tablespoon butter
  • 1 clove garlic, minced
  • 1 jalapeno pepper, finely chopped
  • 2 teaspoons ground cumin
  • 2 teaspoons paprika
  • 1 teaspoons salt, or to taste
  • 1 (8 ounce) can tomato sauce
  • 1 cup heavy cream

Directions

  1. In a large bowl, combine yogurt, lemon juice, 2 teaspoons cumin, cinnamon, cayenne, black pepper, ginger, and 4 teaspoons salt. Stir in chicken, cover, and refrigerate for 1 hour.
  2. Heat a large frying pan on medium heat.
  3. Pour the marinated chicken {marinade and all} in the frying pan and cook the chicken until no longer pink inside.
  4. Transfer chicken to a strainer and drain all marinade; set aside.
  5. Melt butter in a large heavy skillet over medium heat. Saute garlic and jalapeno for 1 minute. Season with 2 teaspoons cumin, paprika, and 3 teaspoons salt.
  6. Stir in tomato sauce and cream. Simmer on low heat until sauce thickens, about 20 minutes.
  7. Add grilled chicken, and simmer for 10 minutes.
Now for the naan. Naan is and Indian flatbread and goes perfectly with Chicken Tikka Masala. The recipe we used is from allrecipes.com as well. Again, we didn't use a grill, so I've changed it to what we did:

Ingredients

  • 1 (.25 ounce) package active dry yeast
  • 1 cup warm water
  • 1/4 cup white sugar
  • 3 tablespoons milk
  • 1 egg, beaten
  • 2 teaspoons salt
  • 4 1/2 cups bread flour
  • 2 teaspoons minced garlic (optional)
  • 1/4 cup butter, melted

Directions

  1. In a large bowl, dissolve yeast in warm water. Let stand about 10 minutes, until frothy. Stir in sugar, milk, egg, salt, and enough flour to make a soft dough. Knead for 6 to 8 minutes on a lightly floured surface, or until smooth. Place dough in a well oiled bowl, cover with a damp cloth, and set aside to rise. Let it rise 1 hour, until the dough has doubled in volume.
  2. Punch down dough, and knead in garlic. Pinch off small handfuls of dough about the size of a golf ball. Roll into balls, and place on a tray. Cover with a towel, and allow to rise until doubled in size, about 30 minutes.
  3. During the second rising, preheat griddle to medium high heat.
  4. Roll one ball of dough out into a thin circle. Lightly grease griddle. Place dough on grill, and cook for 2 to 3 minutes, or until puffy and lightly browned. Brush uncooked side with butter, and turn over. Brush cooked side with butter, and cook until browned, another 2 to 4 minutes. Remove from grill, and continue the process until all the naan has been prepared.
When all is said and done, we like to dip the naan in the chicken tikka sauce, but you can eat it however you want. Hope you enjoy it!

-Sarah

Friday, March 2, 2012

Pasta Salad

A while ago while trying to figure out how to make a homemade pasta salad, I stumbled upon a really neat article titled "Five Steps to a Perfect Pasta Salad."  I was intrigued, 5 steps and completely adaptable; like a good "choose-your-own-ending" book.  I followed the steps, and my salad turned out awesome! Then I completely forgot about it, until today. I had a huge craving for pasta salad (thank you pregnancy for finally giving me a craving that includes lots of veggies and no chocolate), so I pulled out the article again and for a second time, I was not let down. The results looked and tasted great!
Things I love about this article:
The author, Pam Anderson, teaches cooking classes across the country--sounds like a pretty legit source to me.
The directions are simple, yet very clear.
There are lots of suggestions for things to put in.
And it works!

Here's the salad I made today (with the corresponding steps from the article):
Step 1- Rainbow pasta
Step 2- Broccoli, carrots, and cucumber
Step 3- I didn't have any of the suggestions ready on hand, so I used little cubes of Colby Jack cheese. It worked really well.
Step 4- I left out green onions (my husband is not a fan), and for the herbs I used 1 T. dill, 1 1/2 T. parsley, and the last 1/2 T. rosemary. (The rosemary flavor wasn't very strong, so I think next time I'll do 1 T. of each).
Step 5- I used the link for Creamy Buttermilk Dressing. For the optional rice vinegar or lemon juice, I did half and half. The vinegar taste was a little too strong, so I think next time I'll do all lemon juice or just leave it out. For this salad however, I balanced out the flavors a bit more by adding some extra mayo. Despite some of the negative reviews, my dressing was not overly thick (although with the nature of the salad, that wouldn't have been too bad) or bland (since herbs were already added to the salad).

So next time you need a pasta salad, you can unleash your creativity and easily build one from scratch. Enjoy!

Monday, February 6, 2012

Valentine's Day Dinner

I am so excited for Valentine's Day! I started planning our dinner way to early, just because I couldn't wait :) I am in love with the menu, so I thought I'd share it. (PS-none of the pictures are mine, they are from the awesome folks I got the recipes from!)
Chicken Kiev
Chantilly Potatoes
Roasted Asparagus

And for dessert ...
Baked Doughnuts
Only of course I'm doing heart shaped holes and a raspberry cream cheese glaze (found HERE) instead of cinnamon sugar.

Now it's just the long wait until V-Day so I can actually make all this great stuff! What are your plans for the 14h?

Monday, January 16, 2012

Whole Wheat Bread

I just made the most delicious homemade wheat bread! I had to share the recipe. It is light, fluffy, soft, and so healthy!

Go HERE to find the recipe (it's the one called Darcy's Whole Wheat Bread), and then go HERE for a step-by-step tutorial (very helpful in not over-flouring the dough. Mine looked different while it was mixing since I made mine in a KitchenAid, but the dough still looked the same when you pulled some off).

One last side note, I halved the recipe (to make 2 1/2 loaves) and substituted a scant teaspoon Fruit Fresh for the crushed up vitamin C pill.

Saturday, September 24, 2011

LibriVox--Book Voice

Have you heard of LibriVox? I hadn't until a few weeks ago, and now it is one of my favorite things! LibriVox is a website devoted to audiobooks. All of the books on the site are in the public domain (meaning they were published before 1923, so no one can sue over copyright issues). The neatest part is that it is all run by volunteers and it's all free. People record themselves reading a book, and then you can download and listen to them. Some readers are better than others, but everyone is just a regular person that loves reading. Anyone can volunteer. (I've signed up, but haven't read anything yet). You can read a whole book, or work with other volunteers and just read a few chapters. They also have short stories and poetry.

What kind of books are public domain? The classics: Anne of Green Gables, Treasure Island, Gulliver's Travels, Pride and Prejudice, Little Women, The Secret Garden, A Christmas Carol, etc. Some of the authors include Jane Austen, Mark Twain, Charles Dickens, Louisa May Alcott, Frances Hodgson Burnett, and hundreds more.

I love to listen to books while I do dishes, or while I'm cross stitching. I've had so much fun with this, so I thought I'd share it with you. (If you have any other questions, you can go HERE). Hope you enjoy!

Thursday, July 21, 2011

Homemade Bread Bowls

I don't think there is anything more satisfying than eating a delicious bowl of potato soup, and then being able to eat your bowl! I made these bread bowls for dinner last night and they were absolutely scrumptious.


To make them, you will need:

2 packages of active dry yeast {or 4 and 1/2 tsp. if you don't have the envelopes}
1 cup warm water {110-115 degrees}
1 cup warm milk {110-115 degrees}
1/2 cup shortening
1/2 cup sugar
2 eggs
2 tsp. salt
6 cups all-purpose flour
Cornmeal

1. In a mixing bowl, dissolve yeast in warm water. {about 5 mins}
2. Add the milk, shortening, sugar, eggs, salt, and 2 cups of flour; beat until smooth.
3. Stir in enough remaining flour to form a soft dough.
4. Turn onto a floured suface; knead until smooth and elastic. {about 6-8 mins}
5. Place in a greased bowl, turning once to grease top.
6. Cover and let rise in a warm place until doubled in size. {about 1 hr}
7. After raising, punch down dough.
8. Turn onto a lightly floured surface.
9. Divide in to eight pieces; shape each into a ball.
10. Grease two baking sheets and sprinkle with cornmeal.
11. Place four balls 3 in. apart on each prepared pan.
12. Cover and let rise until doubled. {about 30 mins}
13. Bake at 350 degrees F for 20-25 mins or until golden brown.
14. Remove from pans to wire racks to cool.

To make your bread ball into a bread bowl, cute a thin slice off the top of the bread. Hollow out the inside, leaving a 1/4 in. shell. You can discard the removed bread or use it to dip in your soup, chili, chowder, or stew.

Not only are they delicious, but kids enjoy them too! {at least I did as a kid}
Enjoy!

-Sarah

Monday, July 18, 2011

Sugar Free Strawberry Cobbler

I have been trying to adjust all of my favorite recipes to be sugar and dairy free. I decided to try this one and it was wonderful. Sorry the picture isn't great, and I forgot to take one before I ate some.....enjoy!

Sugar free Strawberry cobbler

¼ cup butter or margarine , softened- I used a dairy free margarine

1 ¼ cup all purpose flour

3 cups fresh strawberries, cut in half lengthwise

¼ cup butter or margarine chilled

Beat ¼ cup softened butter at medium speed with an electric mixer.

Gradually add ¾ cup honey, beating well.

Add egg and vanilla extract, mixing well.

Combine 1 ¼ cup flour, baking powder, and salt in separate bowl.

Add to butter mixture alternating with milk, beginning and ending with flour mixture.

Spoon into a greased 8” square baking dish.

Arrange strawberries on top, but side down.

Combine ¼ cup flour and ½ cup Honey Powder.

Cut in ¼ cup chilled butter with pastry blender until crumbly-ish.

Crumble over strawberries.

Bake at 350 degrees for 45 min. or until a wooden toothpick inserted in center comes out clean.

I used a round 9” pie plate instead of an 8” square pan. I want to try it next time with blueberries or peaches. Mmmmmm.

Potato Salad

I am always looking for a good side dish. Whether it's for a party, a neighborhood bbq, or just dinner with the hubs, I feel like I need a good go-to dish that I know will turn out fabulous. Well, my friends, I've found it. I made this potato salad for dinner with our neighbors last night and it was all I could do not to lick the bowl clean. Now, I know there are a BILLION variations out there on how to make potato salad, and  maybe I'm just a little picky when it comes to it, but I was more than impressed with the taste and simplicity of this recipe.


What you will need:

1 cup mayonnaise (I used about 3/4 cup + 1/4 cup water)
2 T vinegar
1 and 1/2 tsp. salt
1/8 tsp. pepper
1 tsp. sugar
5-6 med potatoes, peeled, cubed, and cooked
1/2 cup chopped onion
3 eggs, hard boiled
1-2 T chpped green onions

1. Combine mayonnaise, vinegar, salt, sugar, and pepper in a large bowl.
2. Add remaining ingredients.
3. Toss gently to combine well.
4. Cover and chill for 2 or more hours.

Enjoy!

-Sarah

Tuesday, June 28, 2011

Homemade Granola

I made homemade granola for our trip to Bear Lake this past weekend. It was so good, and healthy too! I got the recipe from melskitchencafe.com (all her recipes are truly amazing). I'll post the original recipe and put notes of how I made it in italics.
Classic Granola
(this is her picture as well)

6-1/2 cups old fashioned rolled oats (not quick cooking)
2-1/2 cups unsweetened, desiccated coconut (I used basic sweetened coconut)
1 cup raisins (I like golden raisins)
1 cup dried cranberries
1 1/4-1 1/2 cups sliced almonds (or whole, chopped, slivered or a combination) (I used sliced)
1 1/4 cups pecans (whole or chopped to the size you like) (I don't like pecans, so I leave these out and toss in a few more almonds).
1/2 cup high-quality honey
1/2 cup canola oil
1/2 cup sunflower seeds
1/2 cup flax seeds (I never have these, so I just substitute more sunflower seeds)
1/2 tsp salt
1/2 tsp cinnamon
 (I find that I usually need a bit more of the honey/canola oil mixture to get it to clump up the way I like it. Also, if you add about 1/4 cup more honey, you can make granola bars).
Preheat oven to 350 degrees. Combine all ingredients in a large bowl. Mix well to distribute oil and honey evenly. Spread a thin layer of mixture on two rimmed baking sheets (half sheet pans) lined with parchment paper (I used my silpat liners). Bake for 15-20 minutes stirring mixture and rotating sheets half way through until mixture is an even golden brown. Be careful to watch granola: it will quickly turn from golden to burnt and will continue to cook as it cools when you take it out of the oven. Mixture will be moist when it comes out of the oven but will crisp and clump as it cools. Keeps for 1-2 weeks. (Let it cool in the pans. If you stir or move it too much, it won't clump up very well).

Variations:
• Substitute any of the nuts for other nuts such as cashews, walnuts or peanuts (it’s nice to leave some of the nuts whole as it varies the texture)
• Add additional dried fruit such as apricots or dates
• Add 1/2 tsp pure vanilla extract (I always add vanilla)
• For extra-nutty granola increase proportion of nuts

Enjoy!

Tuesday, June 7, 2011

Pumpkin Pancakes

I love pumpkin pie, but I only eat it around Thanksgiving time. I went to visit my sister-in-law this weekend though and she made these little babies. Let me just tell you, they are like heaven in your mouth. They taste just like pumpkin pie. With a little bit of whipped cream and syrup, they are divine!
To make this delectable breakfast, you will need:
3 cups flour
3/4 tsp. salt
2 tsp. baking soda
1/2 tsp. cinnamon
1/4 tsp. nutmeg
1/4. tsp. ginger
2 T brown sugar
2 cups pumpkin puree or canned pumpkin
2 1/2 cup sour milk* (more or less depending on moistness of pumpkin)
3 eggs

1. Mix dry ingredients in large bowl, making a hole in the center.
2. Add pumpkin puree, sour milk, eggs to center of bowl, and mix gently. Do not overmix. If batter is a bit stiff, add a little water until it can easily be spooned onto a hot lightly greased griddle.
3. Let pancakes bake until bubbles pop in the top, then flip—just one time. Do not press down—we want these to be light and airy!
4. Serve with your choice of whipped cream, syrup, and strawberries for a yummy breakfast that tastes like dessert!
Serves 6 hearty eaters.
*Sour milk...this can be in any form: buttermilk, raw milk that has soured (not pasteurized milk), 1 tablespoon plain yogurt + water to make 1 cup, 1 3/4 teaspoon cream of tartar + milk to make 1 cup, 1 tablespoon vinegar or lemon juice + milk to 1 cup. Let stand to clabber for 5 minutes before using.
Hope you enjoy!
-Sarah
*1/6 of this recipe = 344 calories

Sunday, May 29, 2011

Chocolate Molten Lava Cake

Guest writer for the day on this girly blog:  ZACH!!   (fanfare and clapping)

Have you ever been sitting around craving a mountain of gooey, chocolate cake with a bit of ice cream?  Well, this recipe will give you your fix in about 5 minutes.  Besides, we all know how much Nikki likes her "Hot Chocolate Molten Lava Hot Chocolate Cake of Chocolate."  ;)

So, what you'll need for two smaller (and probably better for you) cakes, or one large (but still really delicious) cake:

- 1 1/2 - 2 oz. chocolate bar (the Hershey milk chocolate or even Dark chocolate works great)
- 2 oz. butter (half of a stick) *Note* If you are worried about the pounds, 1/4 of a stick still tastes good too
- 3 tbsp sugar
- 3 tbsp. flour
- 1 egg
- 2 chocolate truffles (or Rolos, like the one shown in the picture above), frozen... yes, frozen. As in, you put it in the freezer for a while (or 1 for 1 big cake)

First, put the chocolate and the butter in a bowl for melting.  All you need to do is nuke it in the micro for about 30 seconds, maybe even 25.  Don't overdue it!  It won't even look melted, but just start stirring until it's one consistency.  If it just don't wanna mix, give it another 5 secs of nukage.  DON'T put it in for 10 minutes and walk away and forget about it ... *cough*

In a separate bowl combine the egg and sugar. Whip it good (whip it! whip it good! ... never mind) until the sugar is somewhat dissolved.  Slowly add the chocolate mix while mixing.  Slowly add the flour while mixing.  Now you have your batter!

Here's the fun part.  Get out two mugs (or 1 big one).  Yes, mugs - as in, hot chocolate mugs.  Lubricate... Sarah hates that word... I mean, GREASE the insides with more butter or shortening rather liberally.  Then, evenly split the batter into the two mugs.  Now, drop one of your chocolate truffles in the middle.  Don't worry about pushing it down much, because as you will see, during the nuking the batter kinda swarms around the truffle.

To cook:  I've never put both in the microwave at the same time, and I don't know if it would mess up the time or not, so just do one of the cakes for now... Nuke it for about 1 minute and 30 seconds.  Now, get out a plate, tip the mug upside down on top, give it a few taps and (hopefully) you will have a cute little chocolate addiction sitting right there in front of you!  Serve with whatever else you are craving and probably shouldn't eat!

- Zach... eh... Sarah's husband...

Thursday, May 26, 2011

Margherita Pizza

Zachary and I are trying an experiment this month. We sat down for Family Home Evening a couple weeks ago with a few cookbooks, paper, and pens. We spent an hour or so picking through the cookbooks for recipes that sounded good or we thought it might be fun to try. Then we put down one meal for each day of the month of May. Since there's only 2 of us and a lot of recipes we found were for 4 people on average, we figured it works out perfect to give us leftovers for lunch the next day! We even have a rating scale for all of this. One scale is for how good the food was and the other scale is for how affordable the meal was. So far, it has worked out fantastically! I feel like the hardest part about cooking is deciding what to make in the first place. This experiment has taken a lot of burden off of both our shoulders.

One of Zachary's picks was Margherita Pizza. I had never had it before, but I like pizza so I thought why not? Then I found out that it doesn' even have marinara sauce or anything on it. I thought, "No way could this ever be good." I was wrong. It was de-FREAKING-lightful!


picture found here
Doesn't it look delish?

It is fairly cheap and it definitely got an "I could eat this everyday" on our rating scale. Here's the recipe:

For the pizza dough:

- 1 1/2 c. hot water (as hot as you can run it from the tap, NOT BOILING or you will kill the yeast)
- 1 1/2 tsp. dry active yeast
- 1 tbsp. olive oil
- 1 tbsp. salt
- 1 tbsp. sugar
- 3 c. all-purpose flour
- oil for greasing the bowl

For the Margherita topping:

- olive oil for brushing
- 4 cloves sliced garlic
- 2 large ripe tomatoes, or similar quantity of small ones, or cherry tomatoes (whatever you have on hand, can purchase at the grocery store, or can pick out of your garden)
- 3/4 c. grated mozzarella
- 1/4 c. grated parmesan
- about 15 large fresh basil leaves


(IMPORTANT NOTE: this dough recipe is good for TWO pizzas, so if you want two Margherita pizzas, just double the amount of Margherita topping ingredients, OR you could top that second pizza with your choice of traditional pizza toppings.)

1. Sprinkle the yeast over the top of the hot water. Use the hottest water that you can run from your kitchen tap. DO NOT use boiling water or you will kill the yeast, and your dough will not rise. Let the yeast "bloom" for 5 minutes.

2. Add the olive oil, sugar and salt to the yeast, and stir.

3. Measure the flour into a large bowl. Add the yeast mixture to the flour and, using a wooden spoon, stir until well combined. The dough will appear VERY gooey - this is normal, as it makes a much more tender dough. DO NOT add more flour to the dough during this step.

4. Brush or spray some oil over the sides of the bowl and the top of the dough. Flip the ball of dough over and oil the other side. This will help when removing the dough after rising.

5. Cover the bowl with a clean kitchen towel, and set in a warm location to rise for 1 hour. Looking for a warm location? Try above the fridge, above you cabinets, or on the stove as you're preheating the oven for the next step!

Onto the good stuff - this is where you can easily diverge from the recipe and top your pizza however you want, but I STRONGLY suggesting Margherita toppings. If, however, you choose to go your own way, skip ahead to the next step for directions for how to bake the pizza.

1. Slice the tomatoes as thinly as possible. Use a serrated knife to make the task easier. The more thinly you can slice them, the less soggy your pizza will get after baking. Set them aside for now.

2. Mix the mozzarella and parmesan together. Set them aside for now.

3. Thinly slice the garlic cloves and set them aside. Wash the fresh basil to remove any traces of dirt, then lay them out on paper towels to dry. These will only go on the pizza AFTER baking, or else they will dry out and lose all their flavor in the oven. By putting the basil on the pizza after cooking, they will slowly release they flavor as they warm with the residual heat of the freshly-baked pizza. (We have tried it with dry basil and it worked out fine as well.) Now you are ready to garnish your pizza!

1. Preheat the oven to 500 F. Set one rack in the lowest position in your oven. If you have a pizza stone, place it on the rack before you preheat, so that it can heat to the same temperature as the oven. If you don't have a pizza stone, you can just as easily bake the pizza on a baking sheet. A pizza stone is a good investment, however, as it makes for a nice crisp outside and tender inside to your pizza crust. I highly recommend it. (They can be found for $7.99 at Ross. Holla!)

2.  Roll out half the pizza dough for one pizza, to 3/4-inch thick. Place it on the pizza stone or baking sheet. If using the baking stone, be careful not to burn yourself!

3. Now for the toppings: Brush or spray the top of the rolled-out dough. This is important, as it creates a barrier between the dough and the juicy tomatoes, which prevents the dough from getting soggy. Sprinkle the garlic slices over the oiled dough. Place the tomato slices/halves/pieces over the dough, leaving a 3/4-inch space on the edge for holding the crust, and overlapping the slices where necessary. Sprinkle the mixture of cheeses over the top of the tomatoes. (If you are using dry basil, this is where you would sprinkle it to taste, over the cheese.) That's it - your pizza is topped!

4. Bake for 12-15 minutes, depending on how brown you like your crust, and how hot your oven runs.

Once that timer rings, remove the pizza from the oven, either on its baking sheet or using a pair of tongs to slide it off the stone and onto a cutting board. Turn off the oven.

Immediately place the fresh basil leaves on top of the freshly-baked pizza. The heat from the melted cheese will wilt the basil and release all the flavorful oils into the air and into the pizza.

Time to enjoy a taste of traditional Italy - grab your pizza wheel and slice into a piece of heaven. I think Margherita has become my favorite food. Try it and let me know what you think!

-Sarah

Calories: 226 per slice (1/8 or pizza)
Total Fat: 4.9 g
   Saturated: 2.1 g
   Polyunsaturated: 0.3 g
   Monounsaturated: 2.1 g
   Trans: 0 g
Cholesterol: 10.3 mg
Sodium: 1011.7 mg
Potassium: 189.3 mg
Total Carbs: 37.3 g
   Dietary Fiber: 2.1 g
   Sugar: 4.2 g
Protein: 8.7 g
Vit. A: 8.5% DV
Vit. C 10.3% DV
Calcium: 11.2% DV
Iron: 9.3% DV

Wednesday, May 18, 2011

Buffalo Dip

We have been lacking posts lately, so I thought I would update with a couple of my favorite recipes.
This recipe is addicting and a crowd pleaser!
Have a party or event coming up and need an appitizer?
Check out this recipe here.


Enjoy!
-Nikki

Mississippi Mud Cake

I posted this recipe here.
It is a great rich combination of brownie and marshmallow!
MmmMm!
I LOVE them!


Enjoy!
-Nikki

Wednesday, May 4, 2011

flannel baby blankets

This is an easy sewing project that even the beginner can do.
It makes for nice shower gifts or a fun project for your own.
I made these for my baby boy.  I had 3 coupons for 40% off a cut of fabric, and decided to use them today.

I got a 1.25 yards of 4 different fabrics
The best part is you don't have to make any cuts because they are (or should be) the same size as one another!

First I pinned two of the fabrics together, printed side facing inwards toward each other and pinned them together like so.
 

then I sewed the two pieces together, leaving a 4 inch gap open to flip it right side out.  Top stitch your opening to close it off.  After closing it off, I ironed it to get it to lay flat.  Once it is ironed flat, stitch around the edges to give it a nicer look and to keep it in place.  I used a 3/8" seam allowance.
Wha-la!  Finished!


Have fun!
-Nikki

Tuesday, May 3, 2011

Slush

This is an AMAZING drink!
It is fruity and delicious.
Give it a try and you will become addicted!
Click HERE to get the recipe
enjoy!
-nikki

Monday, May 2, 2011

Pluckett

This is a delicious breakfast or treat!
It is a favorite in my family
click HERE to view the recipe


Enjoy!
-Nikki